

I went from being pretty meh at designing interiors, to being pretty excellent at it – primarily by learning the “rules” of interior design. I decided to try and strategically learn the aesthetic rules for having a more pulled-together-looking garden, too, since prior attempts have always been a hodgepodge that looked chaotic and unconsidered at best.
First, I asked my Bryn Mawr alum gardening group* for some basic gardening aesthetic design rules, and I immediately got the following gem:
When designing a planted container, aim to include a thriller, a spiller, and a filler.
Great rule, right? Really easy to grasp! Thriller = taller and more dramatic, eye catching; spiller = a thing that can cascade elegantly over the edges; filler = something else, probably that grows shorter than the thriller and fills things out, duh. I threw together a few planters and found it refreshingly simple to do so with this rule (even though I broke it a bit, as I tend to do).

Here’s my first ever attempt at this, please pardon the very lazy snap with empty pots visible, haha – we’ve got wine-pink hellebores and blue-purple anemones (these ones sagging but others stood up, go figure) as co-thrillers, with some grape hyacinth bulbs to follow and add structural contrast with their very upright leaves. The filler is some purplish aubrietia in the front there that has yet to bloom or fill out, but the foliage of the anemone also fills in the back quite well. And the ivy is the spiller that cascades out, for now.
I also have three matching planters with mainly this same mix. I love them! I also added in a tall white and deep purple foxglove to give some more height and summer variety since these are currently all pretty spring-y blooms, and have scattered some poppy seeds for summer to autumn interest. I’m sure I’ll plant in other seasonally shifting things down the road, too, but for now I’m happy.
With this initial success, I then set about trying to figure out and crowdsource and research up some other design principles for my own little garden, for minimal effort (lazy!) yet quick impact. Mind you, plenty of these won’t be relevant to other garden sizes or goals or locations, but in case it’s helpful, I was motivated to document my learnings.
The precursor to all these aesthetic-minded rules is to learn enough boring utilitarian gardening info, haha. Such as, plant like with like in terms of water and sun and soil needs, figure out what plant hardiness “zone” you are in, don’t plant things that will compete with each other for nutrients (Google “companion planting”, etc). But all that is more like pragmatic/functional gardening info, so I’m focusing in this post on making it look like I knew what I was doing aesthetically, like I have good garden design taste, and/or like I had hired a pro landscape designer when in fact I had not.
Find a good website
For me this is the first step. Even if you end up buying most of your plants in person, find a website that has helpful filtering options. I use crocus.co.uk mostly even though I don’t love it because it has a lot of filters. Here’s a list of the values you may find helpful to filter on:
- Sun exposure: Whether the spot where you intend to plant something gets full sun, partial shade, full shade, etc. If you don’t know or can’t tell what a spot in your garden gets, it’s probably partial shade.
- Hardy vs not hardy: This means, will it survive outdoors in the winter without special treatment? I know from experience that I won’t maintain the care conditions for any finicky plants; thus, I rule out anything non-hardy. You may be willing to overwinter something in a garage or buy and use a cold frame or dig up some tubers or whatever, but I am not (yet) willing to do that.
- Moisture: There may be a rare few plants that like really moist soil or super dry soil, but most in my climate like “fertile, moist yet well drained” – quite the contradiction. Obviously if you’re in Dubai or even LA you’ll have a different approach here; London heavily influences this statement. But this was true back in Seattle too.
- Evergreen vs deciduous This is whether it loses leaves in cold weather or not (or occasionally warm weather). If you’re buying something to fill in a spot, will it stay filled in January? Do you care? Filter accordingly. And remember that your perennials generally come back even if all evidence of them sometimes disappears for months. (Bonus point; it’s cool to find plants that flower in winter and go dormant in summer. Makes your off season more interesting and fun! These plants usually come from other parts of the world from at least me; clematis napaulensis is one. I don’t have one yet but I do want one.)
- Flower colour: More on this later. Can also look at foliage colour sometimes but less common as a website filter.
- Bloom month: One major trick to a well-architected garden is selecting things that bloom at different times in the year, so you always have something putting on a cheerful show no matter whether it’s November, March, or August. This lets you shop more, yay! (But maybe not all at once! Consider leaving some space for inter-season plantings down the road.) Again, think on those fun summer-dormant things that can say hi come December.
- Habit: Is the plant you’ve found and love the look of tall and lanky, spreading ground cover, bushy, climbing, etc? Sometimes even if they don’t have a “habit” filter they’ll have one for front/middle/back of a border, maybe “position” or “placement” etc.
- Height: This to me matters more than eventual “spread” (width, basically) but spread can also be useful. Eventual fully grown height is super helpful for layering. Be mindful that super tall things may need support with stakes etc. Are you willing to deal with that annoyance? If not, find something sturdier instead. (Not all tall stuff needs support, and it can be easy enough to do if you’re growing in front of a fence where you can just run a string, or buy a cheap stake thing to poke deep into the soil. I save all the bamboo supports from old nursery plants in case I want to reuse them for tall things later.)
- Perennial vs annual: Perennials come back every year, annuals don’t. Sometimes annuals self-seed though, and the description of a given plant usually tells you. Some things are biennial or short-lived perennial. In keeping with laziness I tend to prefer perennials so I don’t have to do the main planting work (or purchasing) more than once, but annuals are forgiving if you make mistakes, ya know? Just beware of self-seeding annuals that will spread where you don’t want them to; you’ll have to essentially “weed” out any volunteers or replant to the intended location and that can add up to more work than you realise.
- Soil pH: acid v alkaline; most plants won’t be acid but the ones that are seem to be SUPER opinionated about it! (Azaleas, rhododendrons, blueberries, camellias, mainly, and a few other shrubs – have a Google. You can test your soil pH but I mainly just buy different bags of stuff for different plants since I’m entirely container gardening at the moment.)
- Bonus filters: My personal optional bonus filters are things that are fragrantly scented, things that attract pollinators and other beneficial wildlife, and things considered “easy” to grow (yet are not invasive!) Your bonuses may differ; I filter on this only once my more basic criteria are met. (And if a site has a filter for “not invasive” definitely keep that selected!)
If you have problems with deer or rabbit eating your stuff, or even slugs and snails like me, consider filtering on resistance to those pests.
Don’t stress if this seems too much; you’ll learn to care about this stuff bit by bit but it’s nice to have a website that lets you drill down efficiently, even if the purchase happens elsewhere.
Make a plan
This is hard advice to follow, and sometimes the plan has to evolve alongside your exploring and discovering – that’s fine. I started with hand drawings but then gave that up and just started up a little Notes thing on my iPhone with a pic of each planter or just a text description, and I wrote in the different things I planned to put in each layer (more on that later).
Here’s an example snippet from my plan, including the lazy image pulled from the planter’s auction listing:
Medieval trough planters x2:
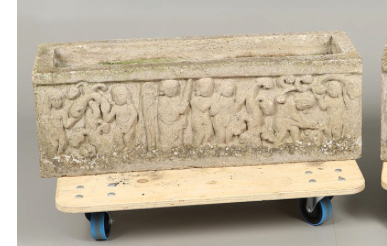
Back row: Penstemon (1m) x3 (summer), bearded black dragon Iris (1m) x2 (spring)
Middle row: bloomsation coreopsis .5m x3 (summer but foliage now), echinacea purple emperor .5m x3 (summer)
Front row: heuchera lime little cuties (.25m) x3 (summer), viola odorata (.1m) (growing from seeds scattered but foliage year-round)
This helped me avoid over-buying randomly, so I didn’t end up with more or fewer plants than I actually needed to make my space look complete, and it helped me remember stuff. You may be more of a gradual gardener but you can still keep a living document like this and reference your prior plantings (which may bloom in other seasons, remember?) I found it to be a useful exercise and more reliable than my memory about what spots I had, which existing things I already had, etc. Oh yeah, put your existing things into your plan, unless you don’t intend to keep them!
I also started up a Pinterest board of all the specific plants in my garden (as opposed to a more inspirational/goals/ideas kind of board) so I can specifically look at a plant, click to see its official name and care/planting instructions.
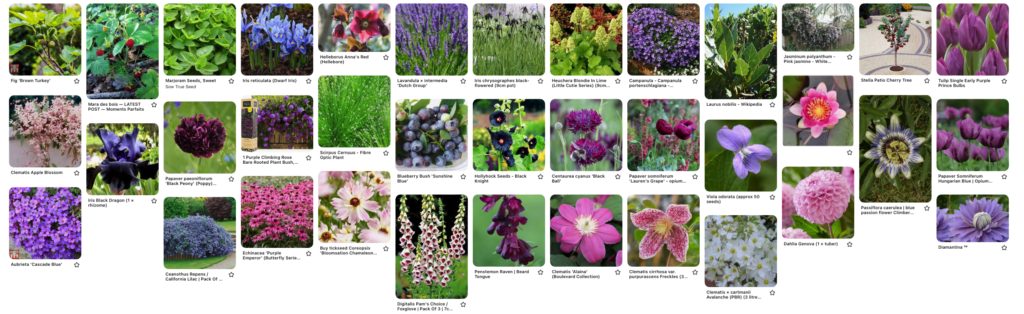
We’ll see if I stick with this and it helps me or if I end up abandoning it, but Pinterest lends itself well to visual references like this for me. (And how cool to see my own colour palette so cohesively well represented when we pull back and view them as a collection! Let’s make that the next tip!)
Limit your colour palette
This might seem boring, but I swear it is one of the two most important things you can do to look more pulled together and cohesive in the garden! (The other being to repeat the exact same plant, not just colour.) Choose a few colours of bloom for flowers – for me it’s pinks, blues, purples, blacks, and whites, and sometimes greens, with no yellow/red/orange at all. (They apparently call it a “bruised” colour scheme, hahaha, gross/rad.) That might seem boring, but it makes it easier to look more pulled together while also cutting down on garden centre/online shopping cart overwhelm.
You can always add in other colours later, but it’s much harder with some plants to take them back out, especially if you’re planting directly in the soil rather than in a raised bed or container. (I’m exclusively container gardening for now so I have more liberty here, but am still keeping it limited.)
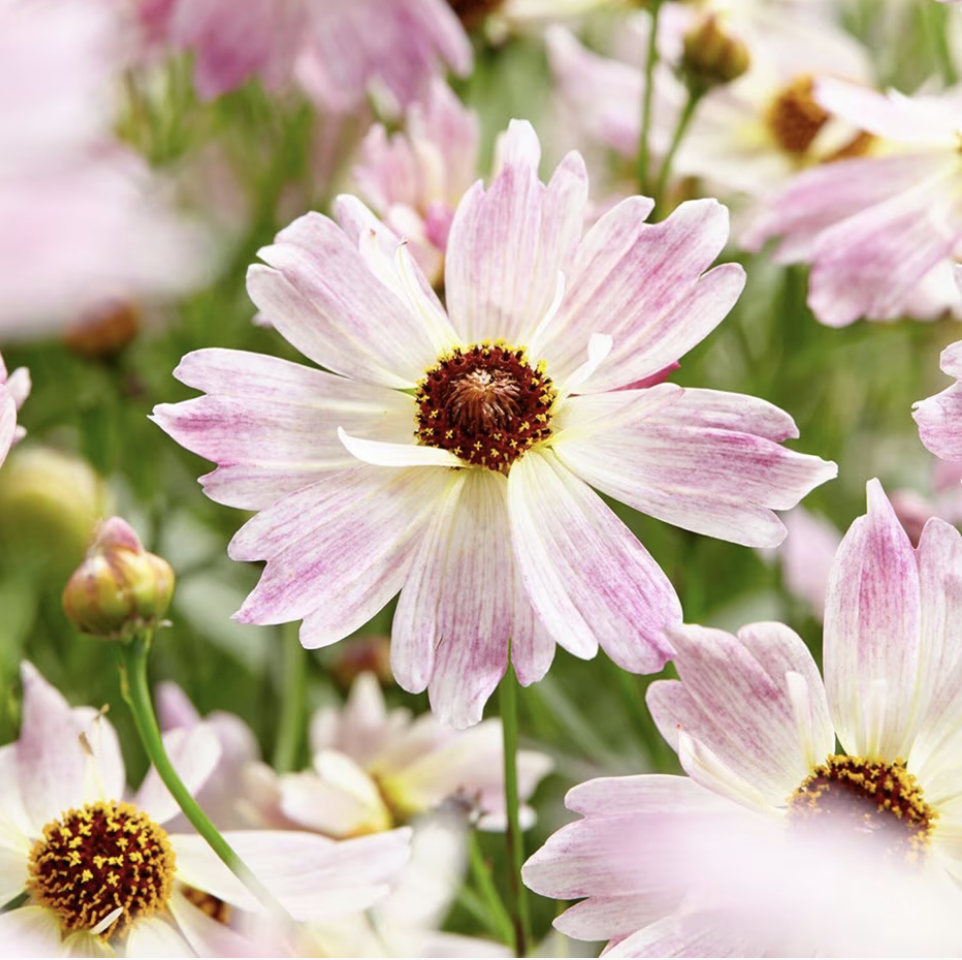
And by the way, sometimes plants have weird varietals in colours that work for you – I can’t find (and don’t need) a pink or purplish crocosmia, but there are sunflowers in burgundy and rudbeckia in green, if I really need to bring those into my garden. (I secretly kind of hate the look of sunflowers but they’re my husband’s favourite, so I’ll probably find a way to incorporate them somewhere eventually.) And I love coreopsis but don’t love bright yellows, so I found one in a creamy pale pink that works great with my colour scheme, yay!
Choose a palette that works together cohesively well for starters, or one for fun contrast you love if you prefer (like purple and yellow). If you have trouble deciding, there are a lot of ways you can start picking. For my most pulled-together vibe, I wanted to base it on the interior colours of the room from which I can most easily see the garden, which is all cooler blues/greys right now, hence my scheme without the really warm red/orange/yellow. I also wanted to consider the hard finishes of my home (brick/siding, stone, fencing, etc) and any garden furniture I was committed to keeping, but you don’t absolutely have to match plants to non-plant stuff. That said, in Seattle we had really bossily coloured dusty pink brick, and it didn’t look right with really bright saturated tropical blossom colours. So for a higher end “designed” look, it is kind of cool when they work well together.
You could also use a favourite flower as a basis for a colour scheme – love those purple and yellow reticulated irises? There’s a scheme right there (maybe with white added in too). Love a certain colour in your wardrobe? Use that as inspiration! One blogger I read (more for her colour/undertones advice than actual interior decorating, fwiw) did her entire garden in exclusively white flowers so that everything would always match and look coordinated. Too boring for me, but I get what her point was – it certainly simplifies your decision-making!
Oh, but watch out for plants with foliage that goes wild colours – you might not care about a deciduous tree that’s temporarily yellow, but maybe you don’t like a clematis whose foliage comes in bronze before going greener as it matures, or something that goes bright red all winter. If a plant’s online description mentions vibrant foliage, make sure it works with your vision (this hits me particularly since bronze or red is often the colour that leaves shift to, and it’s exactly what I don’t want for my look).
Further on the colour point, I personally don’t care for mixes – this is most common in seeds but can also be found in growing plants. I prefer to group a single colour together, so I don’t like, say, a mix of five different colours of daisy seed all in the same packet. This is personal preference, but I find that mixed flowers tend to yield a more casual, unintentional look, which is fine if that’s what you’re going for but it’s the opposite of my garden goals this time around. I also don’t like mixes of different kinds of flowers all in the same seed packet for the same reason – this is super common with, like, butterfly-attracting wildflowers, and it’s fine for how they grow in a natural meadow, but that just isn’t my personal garden vibe.
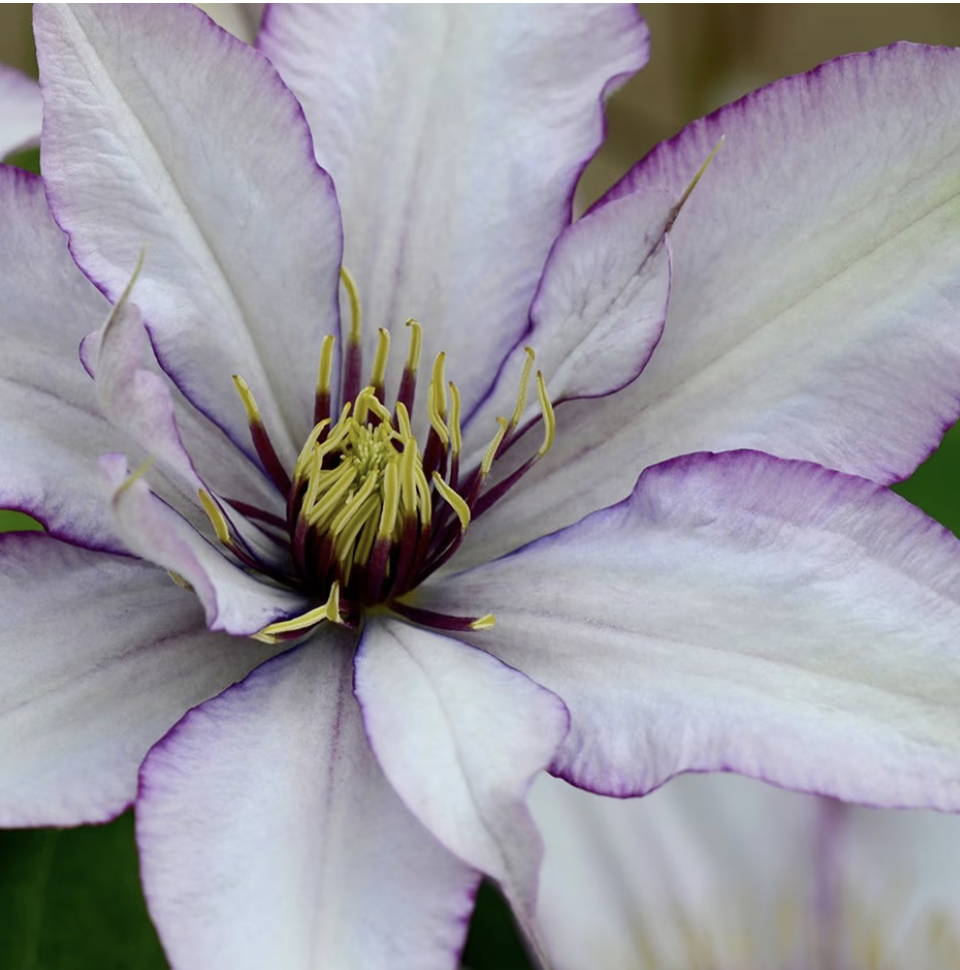
I often feel similarly about two-tone, variegated, or patterned blooms – with a few rare exceptions (like a classic purple outside, white inside Columbine) I tend to strongly prefer blooms that are uniform in colour. I think it’s because at a distance it gives a clearer impression of an intentional clump of a specific colour. I do have a few notable exceptions with really cool bicolour patterns (like this Samaritan Jo clematis, white with purple edges of the petal, or the Pam’s Choice foxglove you’ll see in a sec) but they’re exceptions for me.
Your own preferences may differ on this one, but again, the guidance I’d give is to try and pull back and view your garden as a whole – so that Pinterest board zoomed out and screenshotted is actually a super useful exercise (so let’s see it again).
What impression does a given flower or mix leave when it’s viewed as part of a larger whole? (If you pin a mix, try getting a pulled-out shot, not a macro detail shot.) Let that from-a-distance impression be your guiding light so you don’t over-buy things that don’t fit the vision.
Looks like I’ve got that coreopsis that’s kind of cream-to-pink, the bicolour Pam’s Choice foxglove, the freckled evergreen clematis, and the passionflower as my multicoloured elements, but for the most part other things are a single bloom colour, or at least not wildly dappled/striped/veined/etc. That might evolve over time once I see how this all grows in.
Repeat the same plant in multiple places
This is SUCH a good tip. I never did this at our old house and it’s the reason everything looked such a mess. Buy multiples of any specific plant you decide to put in, and put in different clumps or clusters of it evenly distributed throughout your garden, as much as your garden’s sun aspect allows.
To that cluster/clump point, buy more than one to put in each repeating place, unless you can tolerate waiting for certain plants to kind of clump out and form bigger plantings a few years down the road. I would say go with 3x for each clump, and 3 different clumps minimum, in the same space where you can see everything (unless you’re hardcore about bilateral symmetry, in which case 2.)
I already failed to follow this rule with my own recent plantings and I suspect I’m going to regret it; I evenly distributed my plants throughout my long skinny trough-style planters instead of clumping them together. Only time will tell if it’ll come in looking nice and cohesive or I’ll have to do some digging! (Seriously I am so much better at giving advice/sharing learnings than I am about following, haha.) I just don’t yet know how quickly each one will kind of fill out.
Layer your beds by height
Most garden websites talk about this in terms of “borders” (at least in the UK; I never got that advanced in America, hah). It means you have taller stuff at the back, mid-height stuff in the middle, and shorter stuff in the front. Allegedly obvious but also super easy to get wrong if you don’t plan ahead about what and where you plant, right?
You don’t have to deliberately search for plants by height, but pay attention to the height when you fall in love or even like with a particular plant, and don’t end up buying all tall things, for example. (Easy to do because they’re often the showiest! So many of my faves all come in at about a metre h high) Keep in mind too about different blooms for different seasons; you can layer in things that will come up later in the year if you don’t crowd it all too much.
And look up these details on specific varietals (for example most echinacea run like a metre tall but I’ve got one that’s half that height specifically so I can layer it in front of something taller; same with a heuchera that’s unusually bushy and short for the front row). No need to give up if your true love doesn’t meet your height because someone out there has probably already created a weird hybrid that will do the trick.
Vary texture, shape, colour, and size
Contrast is a key interior design principle, and this is true in gardening too. Plants that all have the same three inch long skinny leaves look boring at best next to each other; a small frilly leaf next to a big waxy one next to a three inch long skinny one will be more interesting. (Granted, sometimes this means plants have differing sun or water needs or tolerances, but not always.) I am guilty of not paying as much attention to foliage as flowers, but this is a good tip even if I often fail to follow it.
For colour I won’t layer a dark thing behind another dark thing; I’ll put a hot pink or white thing in front of a dark thing and then have the frontmost row be a purple thing, for example. I am not perfect about varying foliage colour as much, but I have some deliberately lime green leafed things to add contrast.
For blossom shapes, I won’t have a penstemon next to a snapdragon next to a foxtail, but I could have any one of those tubular flower things next to a more daisy-shaped thing, for example, even when they bloom simultaneously. I’m still torn on whether it was wise for me to plant coreopsis and echinacea of the same height but different colours together in the same planter, bc they have a similar blossom shape – I’ll report back! (And dig up and relocate whatever doesn’t work.)
Obviously this can be subjective and down to taste, but I think varying every element you can think of is ideal.
Rest the eye somewhere
I’m really bad at this one, both inside and outside – I’m kind of an accidental maximalist. But the idea is to plant maybe a foliage-only thing here and there to give the eye somewhere to “rest” between all the exciting blooms. Like having a couple solid coloured pillows on your couch along with all the wild ones. Do as I say, not as I do!
I sometimes lean on herbs to fill this need; often culinary and medicinal herbs do in fact flower but it’s not usually as showy as what I’ve selected for neighbouring plantings. Just watch out for herbs that seem short but may become very tall, like lavender, sage, rosemary, lemon balm… a lot of them. Also, usually randomly seeding in herbs is gonna look less pulled together than deliberately choosing a “resting” filler plant. (I probably wouldn’t do the herb thing if I had more total space to work with.) I also like using plants that are evergreen perennials for this, because even post-bloom their foliage can serve as this resting place.
Now we know why nurseries are always full of all those slightly perplexing ornamental grasses, right‽ (They also make for good “architectural” contrast with blooms, fwiw. I don’t care; I don’t love them and they get big and I’m often allergic. No grasses for me.)
Consider bilateral symmetry
This isn’t for everyone, but if you tend to like a more formal or traditional look, consider flanking things with bilateral symmetry. Think of two fancy urn planters flanking a front entryway of an upscale home, for example. They’re not gonna contain wildly different plantings, are they? They’re gonna be the same. You can do that even with a less upscale home and add cohesiveness and a sense of mild formality.
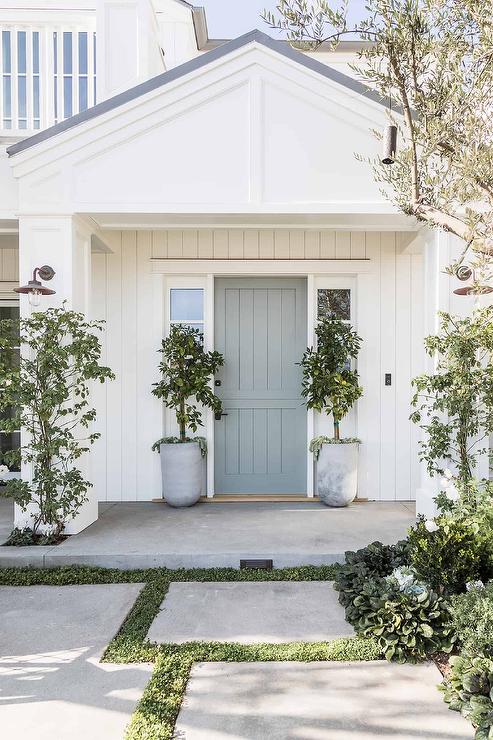
See? Same planter, same plant. (Randomly Googled from here.) Fairly loose given that they aren’t pruned identically or fancily and the home isn’t that formal, but hey… check out that strategic spiller!
You can use bilateral symmetry with matching planters, with garden statues (I have a pair of stone lions that I adore) and it will bring up the cohesiveness and considered vibe in your garden. You don’t have to do this everywhere; maybe just a couple key focal points if you like. Oh and dang, apparently there’s way more symmetries out there, have fun, too much for me haha.
With our house being late Victorian, a bit of posh matching planters strikes the right vibe for me, and is such a simple fast track to looking cohesive. I even bought multiples of two different types of clematis plants so that I could have the climbers echo each other throughout the space. Clematis is a category where there’s so much fun variation that it was REALLY hard to rein in my accidental maximalism, but I think it’ll look so good when they all bloom and reference each other throughout the space!
Seek patina
This is maybe more specific to me, but it matters a ton to my garden vibe. This is a late Victorian house, 1892 we think, and it’s not going to be remodelled super duper modern when we get to that. We like the historic vibes, but that means a bunch of brand-spanking-new fibreglass or plastic or even brand new terra cotta planters just look off here. (Also, sadly, our space is just astroturf over concrete sigh. So I wanted to kind of draw the vibe away from that plasticky synthetic to something with more age, since we need a LOT of containers until we can potentially jackhammer up all that concrete for proper planting beds.)
I found a garden centre that leaves its terra cotta pots outside to weather, so I bought some from there. I asked around in my local community groups for any freebies. I scoured Facebook marketplace. I even found some auction houses and bid on some old authentically worn-in planters and garden statues (and won a few – never had that in America! There are so many grand old mansions here where you can get things with real age and patina by comparison.)
I am glad I put in this considerable effort; it looks so much better now that I have stuff with a bit of moss and lichen growing on it! I also found a way to do a container wildlife pond in a more patinated half whiskey barrel instead of like a fibreglass or Corten steel tub type thing, since we can’t dig down for our pond at present, so that is a more aged vibe than many container pond options. Was also considering zinc or galvanised washtub style stuff but apparently the metal can cause leeching issues in the water that makes it unhealthy for wildlife.
From left to right, here’s my north-facing wall of well-aged garden goods:
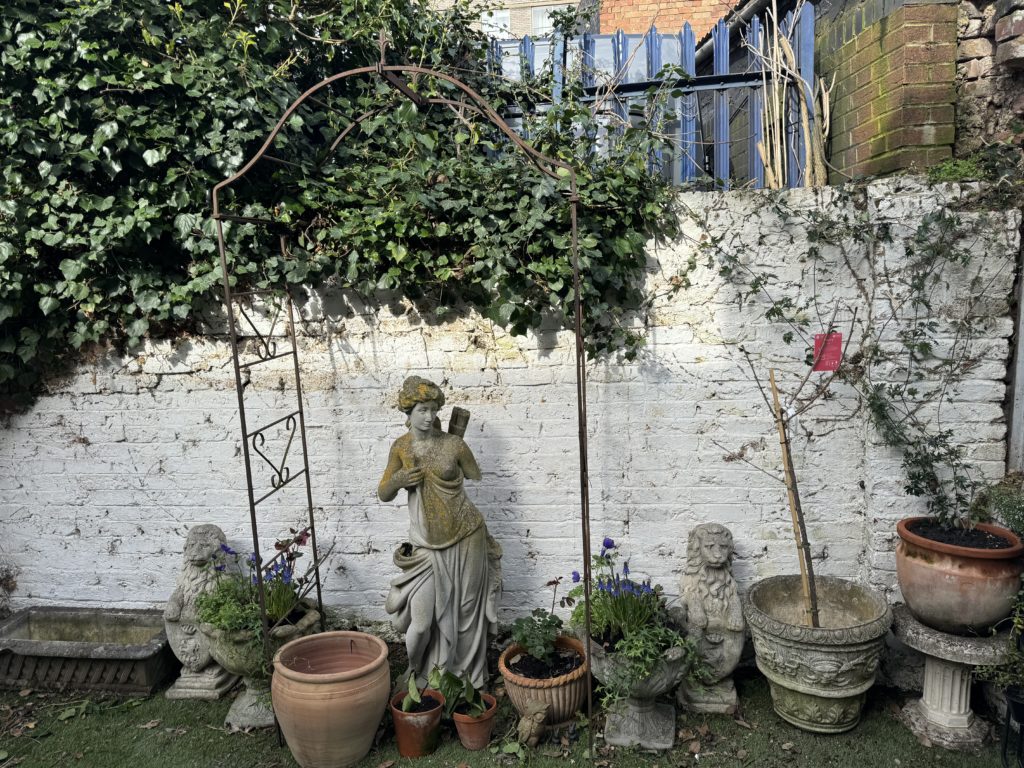
Wicker pattern trough, auction; lion, auction; urn planter, FB marketplace; arch, came with house; pot for eventual blueberry bush, garden centre that leaves them out; tiny two terra cotta pots, neighbour freebie; Artemis, FB marketplace; short ribbed climbing rose planter, freebie from neighbour 2 houses ago; tiny owl and rabbit statues, gift relics from Seattle days; matching planted concrete urn, also FB; matching lion, also auction; big stone green man planter, auction; plinth for terra cotta pot, auction; terra cotta pot on plinth, freebie from new neighbour.
All told that back wall of heavily patinated goods cost me maybe £200 (a DAMN good deal for those large and super heavy things with authentic ageing on them!). I’m not saying it’s cheap, but I’m so much more satisfied than I would’ve been with like Ikea-quality planters and pots that I’m happier this way. (And mind you, I’m still waiting for my online plants order to arrive in to actually fill most of these! I’ll post again with a new pic once I have things planted and they fill out a bit in summer.)
You can also try artificially ageing terra cotta garden planters with yoghurt, buttermilk, and/or magic, but I haven’t found it to actually be effective and I live in a pretty darn damp climate. I think it takes long enough that you’re unlikely to get an instant aged look. Worth a go, though, as it’s hardly expensive or difficult! Have a Google on that one.
Also, a note on statues etc! Modern garden ornaments almost always look like crap to me. If they’re made from true concrete or “cast stone” they can look OK, but often they’re made from resin or other plasticky filler mixed with stone dust and then faux aged, and it just shows. Actual cast concrete (or even metal or fancy shit like marble or granite!) is gonna look so much better. That’s why I was so dogged in my pursuit of genuinely aged stuff. Also, a couple bigger ornaments have way more impact than a bunch of little ones (even though they cost way more). On that note…
Spend more on mature plants
What a groundbreaking “rule” that having more money produces nicer results, right‽ But seriously, if you have £100 budget, you may get more impact by buying fewer more mature plantings than a bunch of teeny ditsy things. I would say to spend enough to get the largest size possible to make the most impact, for things like flowering shrubs, flowering vines, or anything where you’re wanting something BIG. But you can trust that some other things will grow and fill in spaces – read the descriptions.
Also, really small size plants sometimes are way more vulnerable and prone to dying. There are mini seedlings, jumbo seedlings, “plug” plants, small 9cm potted plants, and then more robust 1+ litre container plants. I got a bunch of 9cm things because that seemed like the right compromise, but I must admit some of them look really disappointing now (in early March). If I’d done my shopping more in person I might have ordered fewer total varieties of things but more 1L established things to fill out and provide impact quicker. Live and learn!
You should also spend more to get not only nicer looking pots, but also, the biggest pot or garden bed spot you can afford for certain kind of things that will need room to grow (especially potted trees, fruiting plants, etc.) because a lot of those have robust root systems that need to spread out.
One trick I’m personally using to offset my bigger mature plant spending is to try growing a few other items by seed in case I’m able to grow some lovely things for way less money – and if I fail, the sunk cost is comparatively minimal. (Keep in mind you need somewhere to do this that won’t drive you or anyone in your household up the wall. Tbd on that one for me!) It’s obviously less exciting for immediate impact, and I’m unwilling to do too much work hardening off plants (have a Google) so I prefer to just pick plants where I can sow directly outdoors and hope for the best.
Combine pretty and functional
Remember my trick of using herbs as the filler/spiller in a pot or border? That to me is a combo of pretty and functional. You can grow pretty flowers amongst your tomato or strawberry plants, you can sow nice sweet peas to climb with your culinary beans – sometimes this kind of combo will rob a veggie of its nutrients, but sometimes you can get away with it. Do a bit of Googling for any given crop, or consider locating a planter pot next to a veggie bed or something if you want the visual impact without the nutrient thieving. If you really want a veggie garden but don’t want to sacrifice on aesthetics, there may be a path to both.
By the way, I didn’t come up with this idea myself – it honestly hadn’t occurred to me! But a friend of mine who wanted to work on her landscape design business (but who lived on a boat!) asked me if she could plant out the planter in our backyard and use the pics of it on her website. Enthusiastic yes from me! She did some delicious super-tall cherry tomatoes, interspersed with tall dramatic cosmos (I think). It was so stunning and so refreshing to have functional beauty! Thank you, pal.
For me, my fruiting cherry tree is potted with not one but two pretty clematis varietals (one blooms winter, one summer) to climb through it as well as some chives to keep the soil moist and the bad bugs away with their scent. My blueberry is going to get some scented violets (by seed, so slowly, but still) bc they share the same acid soil tolerance and they’ll help keep moisture in the soil for the blueberry but their shallow roots won’t rob it of nutrients. My potted olive topiaries each have a matching clematis in with them, since the tree can function as the support for the climbing plant, and also some Mediterranean herbs with scents that keep pests away. A lot of companion planting philosophy will naturally give you some aesthetic and functional punch.
And yes, there are tradeoffs here. I will likely reduce the efficiency of any given food-bearing plant this way, but I’m OK with that personally, since we have the privilege of any food we grow being purely extra and not actual subsistence farming. (If you’re about max efficiency of crop yield, this probably isn’t your blog post anyway, haha.) Companion planting herbs and edibles with pretty things is my solution, but if I had more garden space, I’d probably have a single dedicated herb spot and be more aesthetically strategic with other spots. That’s London for ya!
Bonus tips
If you’re struggling to figure out garden stuff or to fill up a specific spot, here are a few of my personal tips that I’ve settled on (by no means as an expert):
- Herbs: As mentioned above, intersperse kitchen herbs as filler/spiller plants and in borders. That way you don’t have to buy as many fillers or spillers or front border items. This works best if you’re the sort who remembers what they look like when it’s time to cook. :) Be mindful of each herb’s growth habit as some can get bigger taller than you realise! (Also mint and lemon balm can get pretty invasive so they’re often best in their own container.)
- Climbers: I love climbing plants a LOT! Passionflower, clematis of all sorts, jasmine, sometimes honeysuckle…. I very much dig a big climbing vine. If you have something that could nicely take a climber companion, such as certain trees or shrubs, it can be a way to add vertical interest. You can also get an arch or pergola or obelisk or trellis – lots of choices to provide support to a climber. Easy to get a bare-metal one designed to rust and give you that patina, too.
Pay attention with all jasmines, as some can be invasive or just annoying; pay attention to any deciduous vines as they can be ugly in the off season; pay attention to pruning groups with clematis (it’s a thing, have a Google). I would really watch out for wisteria for invasiveness reasons, too, and don’t get me started on what we call morning glory in America. Akebia too can be tricky. And honeysuckle!
When you’re worried about something becoming invasive, consider keeping it to a pot for the first year even if it’s a pot sitting on the intended garden bed spot (mindful of drainage etc). That way you don’t accidentally introduce something you’ll struggle to get out if it gets tricky. - Hardscaping: You can do a lot to transform gardens with hardscaping like stones and paths and even water features etc. and make it more practical such as having a patio/deck from your garden leading into your kitchen for taking off muddy footwear and such. Strategic, well-designed hardscaping can bring a major level of garden polish, especially if you have a key item in a focal point. (I for example deliberately placed my Artemis statue in the centre of the back wall of my garden, which is visible through my kitchen, and people often place water features in a strategic spot.)
In my strong opinion, it’s unwise to install hardscaping that blocks surface water runoff (because global warming will mean we only get more heavy and tropical-style rainfall even in temperate climates, just as we’ve seen in Europe and more northern bits of the US in recent years. Give all that water somewhere to go quickly!) Hotter temperatures do something to the way clouds and raindrops form, and makes those summer rains gush more intensely when they do come. This is another one you’ll have to Google for more info, but I heard about it on a convincing science podcast and will never forget it after our last London living room nearly flooded in a summer storm!
Being mindful of surface runoff means not necessarily creating a single solid surface with aggressive grouting, but instead allowing for cracks between pavers to let water drip down. (Better yet, use a more porous material – which I’m not doing for aesthetic reasons, heh.) It also means not deliberately installing concrete underneath, which is what I currently have thanks to a previous owner – sigh! All told, don’t go overboard with the ratio or distribution of hardscaped areas to planted areas, because in addition to not giving the water enough options for escape, it can look sterile and weirdly cheap (despite actually being quite expensive).
Be mindful of keeping your hardscaping in line with your house and garden style. For me and my Victorian, this means no modern/huge/synthetic pavers with too clean of an edge, because with my older home I think it looks more sympathetic to get smaller, tumbled tiles that read as a bit closer to a cottage-y cobblestone or sett even though my space is too small and not quite wild enough to merit full-on cobblestones everywhere.
When we do tile our place, I’ve settled on a bluestone marble outdoor tile that’s 50cm x 100cm, so smaller than most builder-preferred pavers, and 30cm thick to handle the weather here. I’ll also do the kitchen floor in bluestone to carry the look from indoor to outdoor, but who knows if that vibe will work out with the weathering over time. There’s a big trend right now of carrying an indoor flooring outdoors, and I don’t know if it will stand the test of time, but I’m adopting it and hoping for no regrets.
In general, I find that builders love installing huuuuuge slabs of stone because it’s cheaper and easier for them, but that’s not a good reason to do it! Only go for bigger pieces if that’s actually the look you want, and even then, be mindful of giving surface water somewhere to go. (I swear you’ll be thanking me for this tip in 2045 even if it seems silly now!)
If you have super tropical plantings, I’d think more modern hardscaping would suit; if you have cottage-y plantings, cobblestones or more uneven-looking brick would be better, or even big naturalistic uneven flagstones. The main thing I’d avoid, if possible, is poured concrete – sterile, cheap looking, hard to change, terrible for surface water management.
Think about a seat somewhere as you plan any hardscaping, so you can sit and admire your work or any wildlife it attracts! And of course, think about garden furniture for things like dining, fire pits, grilling, etc. Think about whether you want some kind of water feature, or ornaments like statues, bird baths, etc. Don’t get too much/big furniture for the space you have, and be mindful not to block sunlight for plantings that need it.
Consider outdoor lighting, especially if the space is visible from inside your home. Uplighting from the ground looks modern; lamp posts and wall sconces can read more traditional. Solar powered garden lighting almost never works. String lights can be beautiful but can also look like a cheap teenager’s room from TikTok; depends entirely on execution!
I am not really getting into much hardscaping yet in my garden as it’s small, and any pavers, hardwired lights, etc. will come later with a remodel, but I feel that it’s worth a mention as we talk about a pulled together look. Besides, you may need to strategically not plant out certain areas in order to accommodate your intended hardscaping. - Research: Someone in my Bryn Mawr group pointed me to this blog post which was tremendously helpful! She covers a lot of the same points here of course but goes way beyond and has better tips for even larger gardens than I can imagine having here. A lot of the other info I’ve shared here is the product of research, whether online, in communities (like that BMC group or my neighbours who garden), but my fave of all is…
Find that patient garden centre person! That someone who answers your many questions and steers you away from unwise purchases towards wiser ones. I found just such a person in a Cambridge-area garden centre a couple weeks ago, and she was a HUGE help! When you find someone willing to engage with you on this stuff, even when you’re a potentially annoying novice, drink up everything they have to impart and trust their advice. - Rarity: Part of why I enjoy doing a big portion of my plant shopping online is because I can usually find rarer plants that way. I tend to prefer a less “classic” garden – I like a lot of classic flowers, but I like to get them in unexpected colours, habits, shapes, etc. or just generally less common plants.
I try not to get stuff that’s wildly out of cycle for the climate I live in (I am not putting even the hardiest of palm trees in my UK garden, for example, bc I think it looks off even though with global warming it’s actually becoming easier to rear them here) but I like putting in a rare weird goth-hued sweet pea instead of an expected soft pink. I especially love finding dwarf varieties of plants that usually grow taller because I find it makes for more elegant layering. I guess a lot of my tastes run tall.
You may not care about this, but as you get more advanced in garden fun, you might find that you enjoy having a species that makes other gardeners give an appreciative nod. I’m coveting that unusual Nepalese clematis that only blooms in the winter, for example, and I love the idea of eventually getting a passionflower vine in an unusual hue. You may also find that you’re tickled by the pleasing contrast of something like a “granny cottage” garden but with “goth teenager” or “bright day-glow” hued flowers, haha.
And by the way, on that “cottage” note, a lot of advice is going to be to find your garden “style,” which plenty of other blogs will do a lot better than I can, so… you guessed it… have a Google. I kind of like mixing styles sometimes, but I think it’s useful to have a sense of whether a given plant falls into the category of, say, “tropical” or “cottage,” so you’ll know better whether the full picture looks off to you when it’s all planted out. Or, you may enjoy the surprise of a canna lily (tropical) juxtaposed with a hollyhock (cottage)! Entirely personal preference there, but nice to be intentional about it. A lot of plants sort of say what style they are in their description and sometimes this is a filter to apply on plant websites. - Failure: Some stuff will die; consider it a learning experiment. You can’t get too attached to any one thing. If you catch something failing to thrive before it’s fully died you can read up on its soil/sun/water/nutrition needs, or even try digging it up and moving it. But sometimes they just die!
I find it useful to think of most plants as a “consumable” items, like a really nice scented candle or bottle of perfume or tube of luxe conditioner, rather than a more permanent investment item like a lamp or sofa. That way, if a given plant ends up lasting as long as the sofa, it’s that much more satisfying, and you get a sense of success instead of failure. This mental shift is easier said than done, but it’s how I strive to approach gardening so I don’t beat myself up if something doesn’t make it.
Good luck and happy gardening – feel free to tell me what was useful for you or what was a flop!
*We have incredibly helpful groups for everything; it’s the only reason most of us stay on Facebook!